Media-handling problems
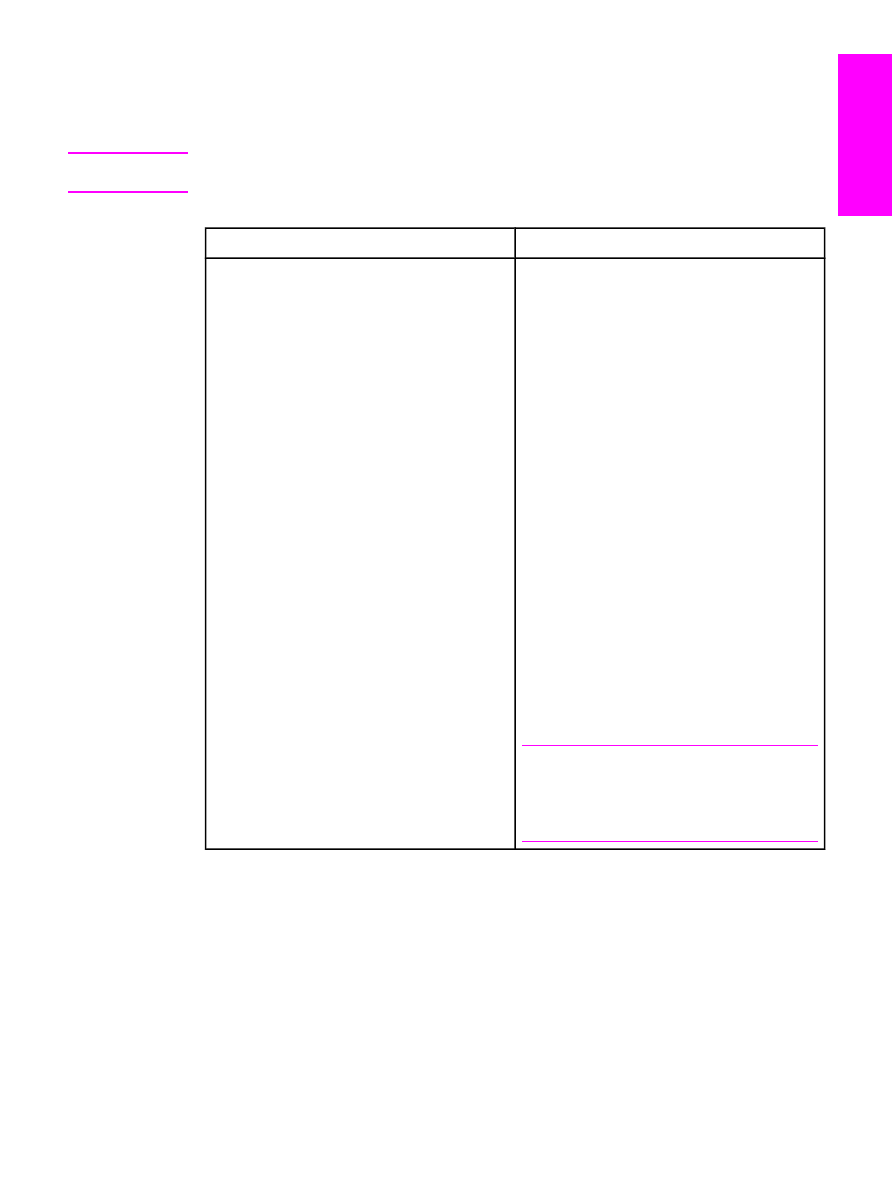
Use the information in this table to solve problems that involve jammed print media.
CAUTION
Use only your hands to remove jammed media. Using other objects can damage the
internal parts.
Cause
Solution
Media has jammed in the device paper path.
(HP LaserJet 3015 all-in-one and HP LaserJet
3030 all-in-one) Push the print-cartridge-door
release, and then open the top cover. Grasp the
handle of the print cartridge. Remove the print
cartridge, and then set it aside. (Do not expose it
to light any longer than necessary. Place the
print cartridge in a paper bag or other opaque
container until you can place it back in the
device.) With both hands, grasp the side of the
media that is most visible (this includes the
middle), and then carefully pull it free from the
device. After you have removed the jammed
media, replace the print cartridge, and then
close the top cover. You might need to restart
the device after removing jammed media.
(HP LaserJet 3380 all-in-one) Open the print-
cartridge door and the straight-through output
door. Rotate the green pressure release levers
at the back of the device downward. If you can
remove the media from the front of the machine
without removing the print cartridge, do so.
Otherwise, remove the print cartridge, and then
grasp the side of the media that is most visible
(this includes the middle), and carefully pull it
free from the device. Replace the print cartridge,
and then close the print-cartridge door and the
straight-through output door. You might need to
restart the device after removing jammed media.
Note
Make sure that the media meets HP media
specifications. See the HP LaserJet Printer
Family Print Media Guide at the following
website: http://www.hp.com/support/ljpaperguide.
ENWW
Media-handling problems
87
English

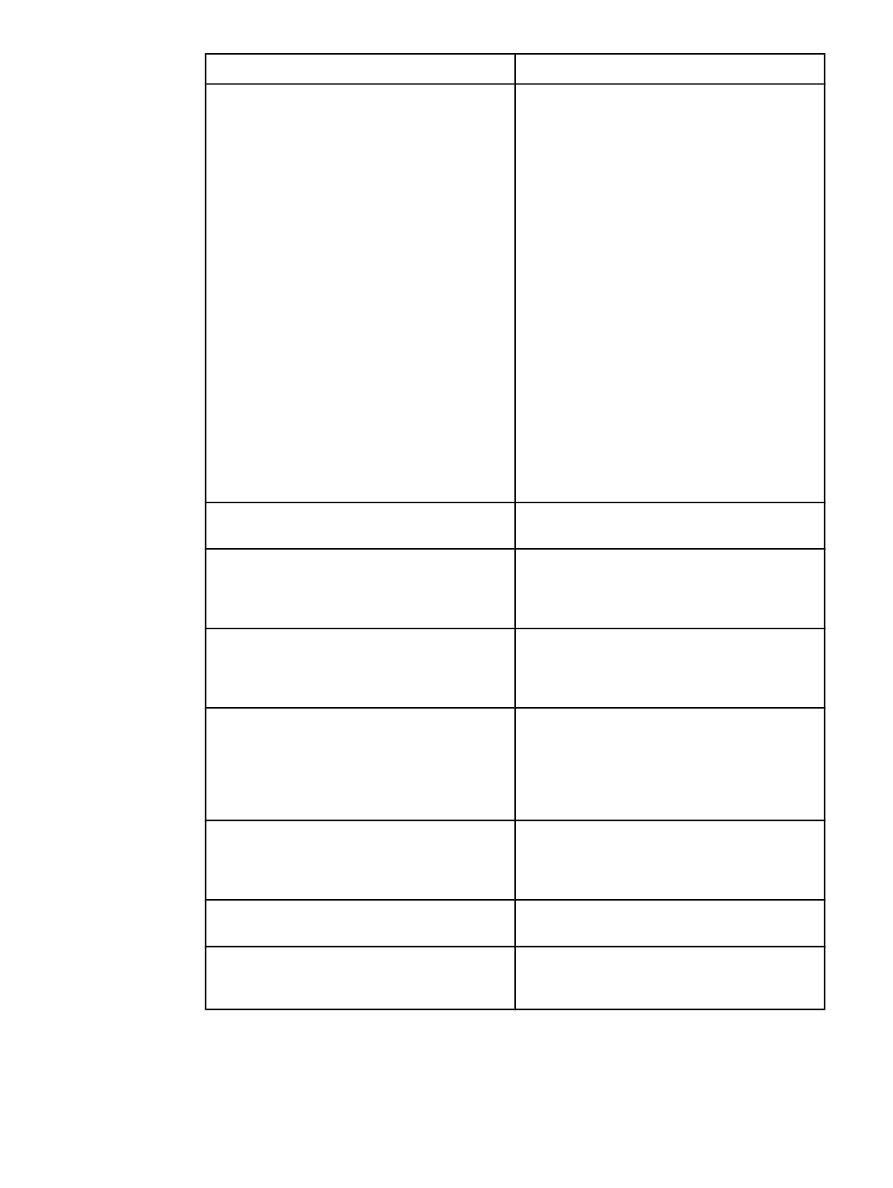
Cause
Solution
Media has jammed in the automatic document
feeder (ADF) input tray.
(HP LaserJet 3015 all-in-one) Using both
hands, pull the control-panel door toward you.
Remove any jammed media. Make sure that all
of the pieces of media are removed, and then
close the control-panel door.
(HP LaserJet 3030 all-in-one and HP LaserJet
3380 all-in-one) Remove the automatic
document feeder (ADF) input tray and open the
ADF cover. Use both hands to lift up on the two
handles on the jam cleanout part until the part
unsnaps. Rotate and lift out the cleanout part,
and then set it aside. Lift and hold the green
lever, and rotate the pick mechanism until it
stays open. Gently try to remove the page
without tearing it. If you feel resistance, go to the
next step. Open the flatbed scanner lid and
gently loosen the media by using both hands.
Close the lid to the flatbed scanner and then
lower the green lever on the automatic
document feeder (ADF). Reinstall the cleanout
part by pushing down on the two tabs until the
part snaps into place. Install the cleanout part
correctly, because future jamming might occur if
the cleanout part is not correctly replaced.
Print is skewed (crooked) because the media
input tray is overloaded.
Remove some of the media from the input tray.
Print is skewed (crooked) because the media
guides are incorrectly set, broken, or missing.
Verify that the guides are not adjusted too tightly
or too loosely against the paper. Check for
broken or missing guides, and replace them if
necessary.
Print is skewed (crooked) because the media
weight or surface finish does not meet HP
specifications.
Make sure that the media meets HP
specifications. See the HP LaserJet Printer
Family Print Media Guide at the following
website: http://www.hp.com/support/ljpaperguide.
The device is printing curled or wrinkled pages
because of the heat produced during the laser
printing process.
Paper curl tends to relax as the paper cools
while resting on a flat surface. Make sure that
the media meets HP specifications. See the HP
LaserJet Printer Family Print Media Guide at the
following website: http://www.hp.com/support/
ljpaperguide.
The device is printing curled or wrinkled pages
when using the output bin.
Open the straight-through output door on the
back of the printer and use this paper path.
Change the fuser mode back to the default or to
a different paper type.
The device is printing curled or wrinkled pages
because the media is not stored properly.
When possible, store media in its sealed ream
at room temperature.
The device is printing curled or wrinkled pages
because the media has been in the input tray
too long.
Turn over the stack of media in the tray or rotate
the media 180 degrees in the paper tray.
88
Chapter 5 Troubleshooting
ENWW